How to DIY a Seed Starting Setup
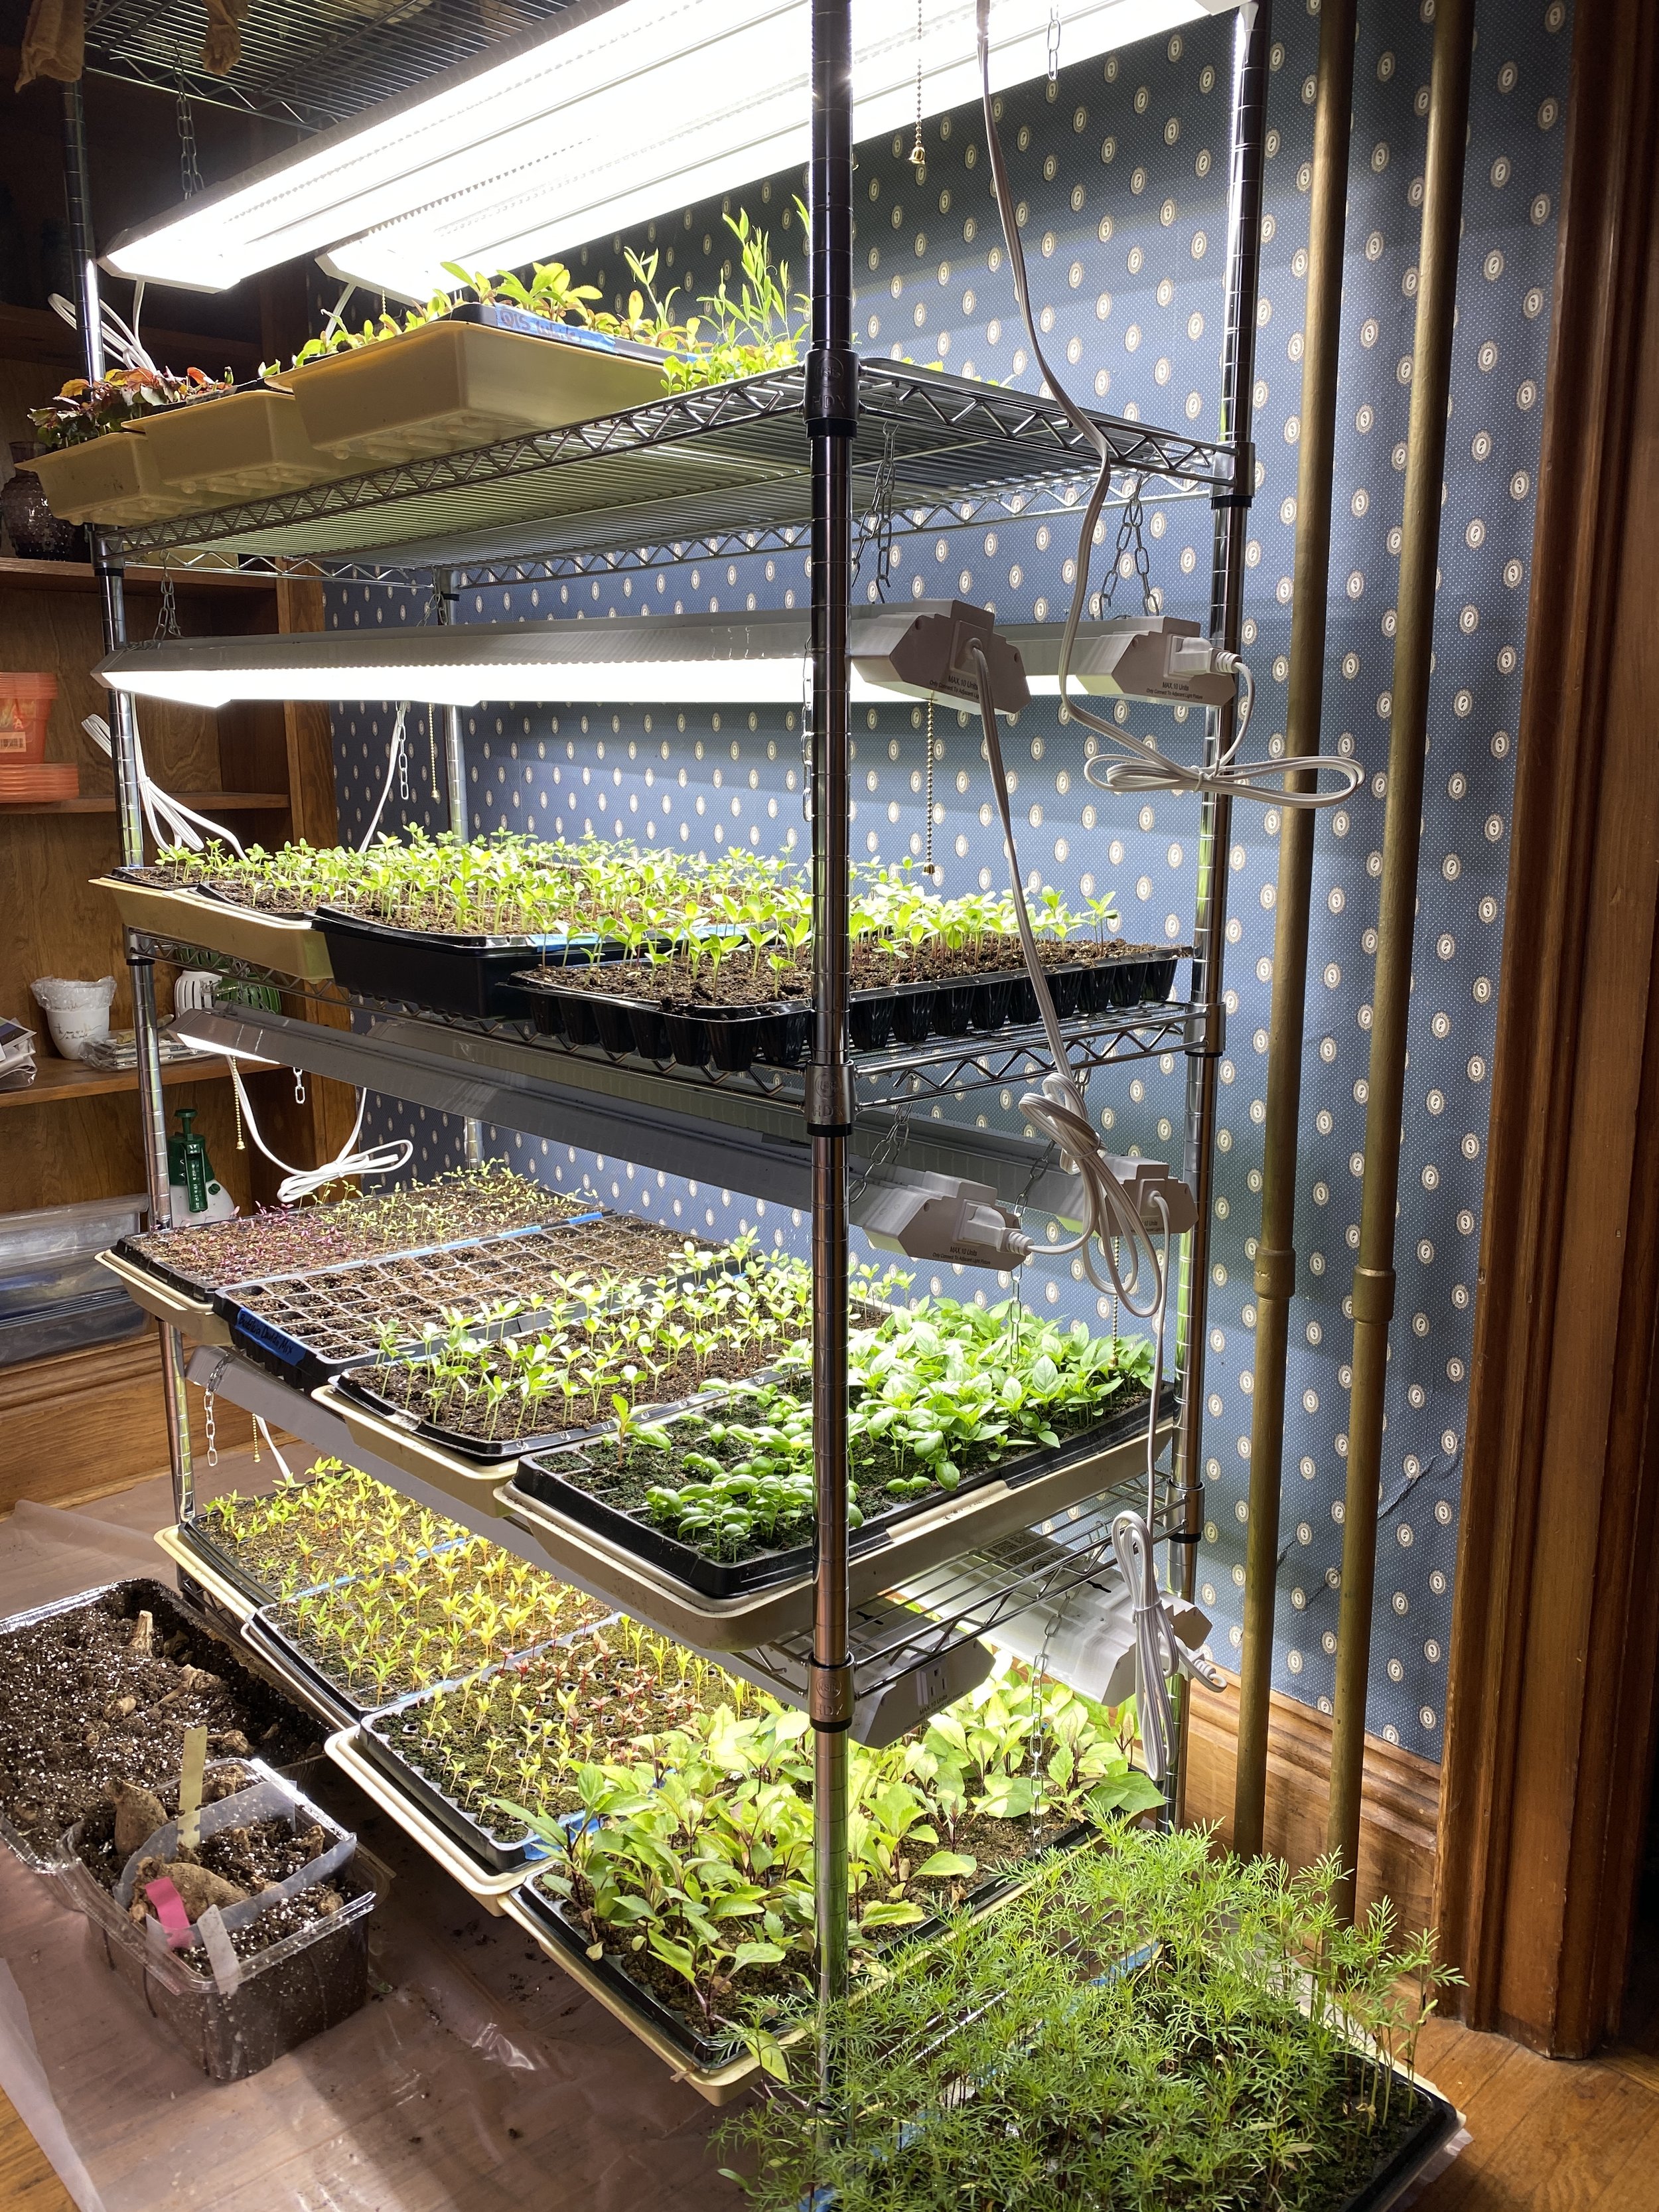
4-ft wide metal seed starting shelf with LED shop lights in 2022
Updated January 2, 2025
Starting your own vegetable or flower seeds at home requires an initial investment in seed starting equipment — and with the right setup, your investment will pay dividends for years in the form of gorgeous, homegrown plants for your garden.
As a cut flower farmer, I grow well over 5,000 seedlings every year to plant out into my 1-acre flower farm. I’m able to grow this amount of plants using just two shelving units, LED shop lights, and basic seed starting supplies.
Related Seed Starting Help: Biggest Seed Starting Mistakes To Avoid
My “propagation space” is actually a spare room inside my house. Yes, I am an actual farmer that does not have an outdoor greenhouse for seed starting. Even us “professionals” successfully grow seeds inside our homes, and you can, too!
In this post, I will share with you exactly how to put together a seed starting shelf using a simple metal wire shelf and shop lights I bought on Amazon. This seed starting system was incredibly easy to set up and the lighting is bright, energy efficient, and helps produce beautiful plants. You’ll learn the specifics for choosing a shelf for seed starting, tips for hanging shop lights, and the other simple accessories we use to ensure a beautiful crop of transplants every Spring.
Related: How to Start a Sheet Mulch Garden
At the end of the post will be a list of all the supplies needed to get your seed starting operation going, whether you’re growing 20 plants or thousands of plants.
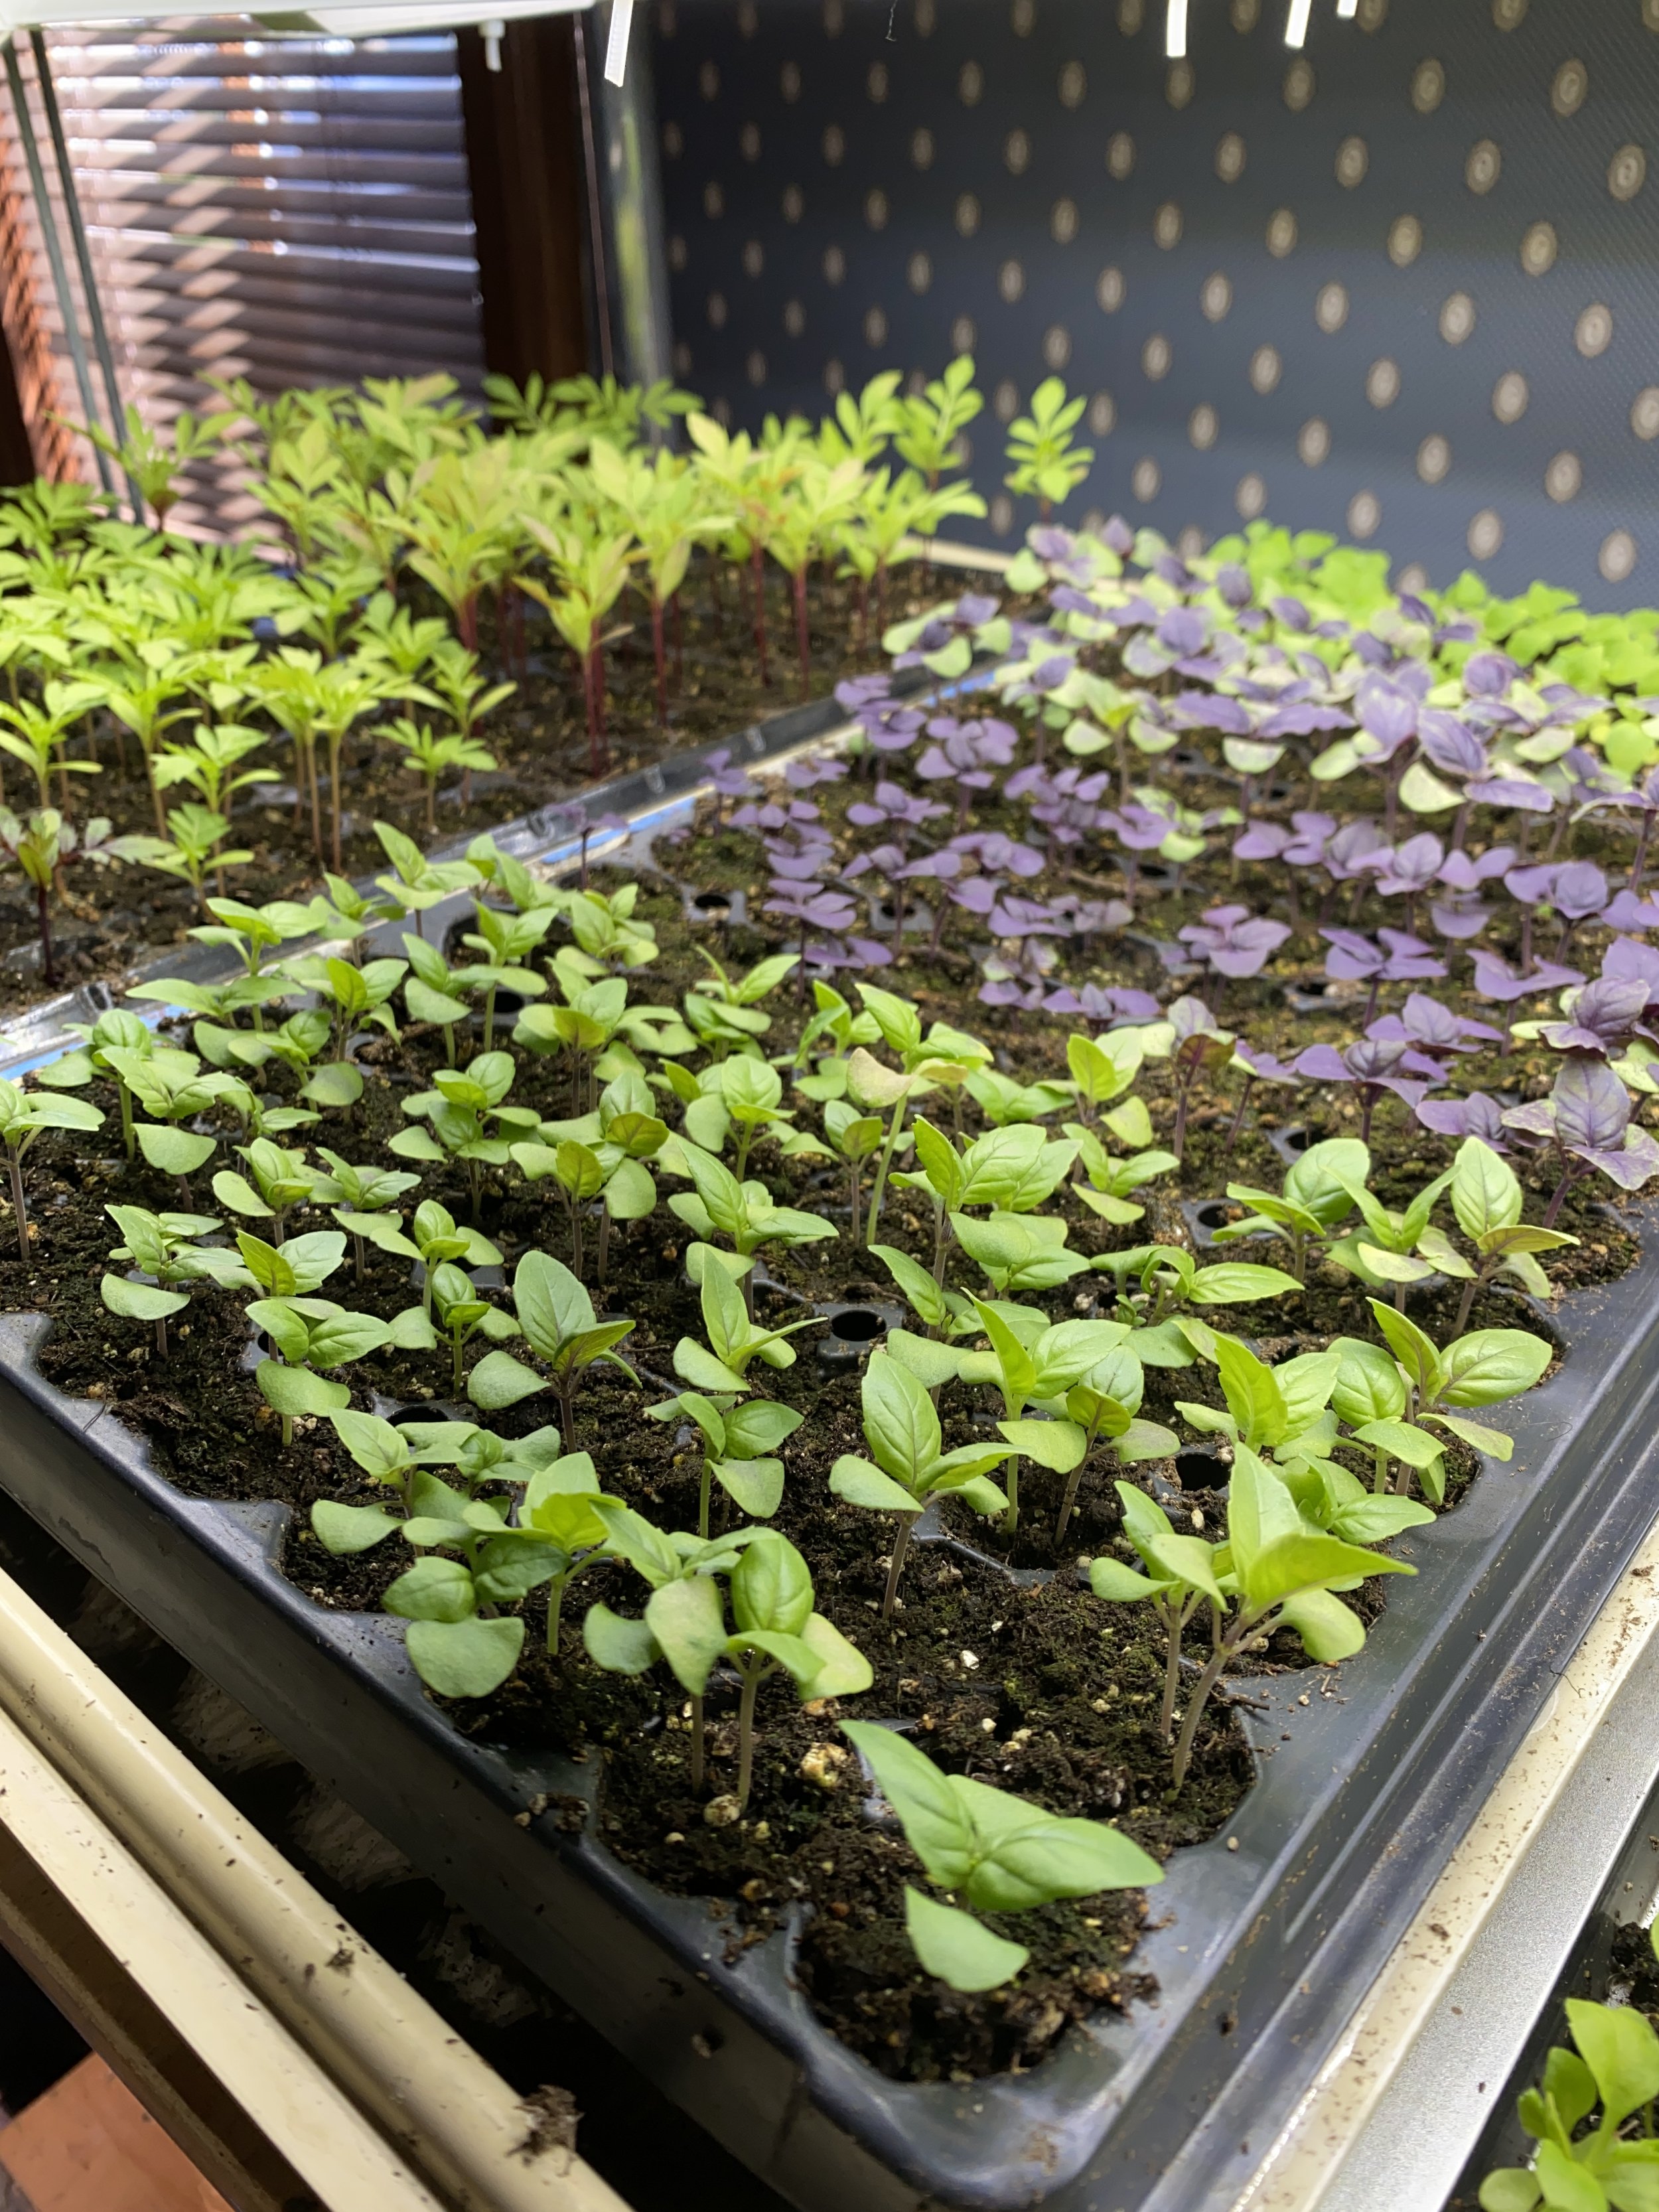
Growing basil and marigolds from seeds in 128 plug trays
Growing perennial sweet peas and annual gomphrena under these LED shop lights.
how to choose shelves for a seed starting setup
I start my own seeds in 1020 plug trays, which are a standard size tray in the greenhouse/gardening world. 1020 trays are a standard size if you are growing seedlings (referred to as “plugs”) in the 50, 72, or 128 plug trays. I recommend you use the standard 1020 size trays as well, so that all of your seed starting supplies fit together.
1020 trays are 10” wide x 20” long, so for every foot of width of your shelving unit, you will be able to hold one 1020 tray on it (A 4-ft wide shelf will hold (4) 1020 trays on it. A 6-ft wide shelf will hold (6) 1020 trays on it). You will want a shelf that is 48” wide by 20-24” deep to properly hold the trays. If you skimp and buy a shelf that is only 18” deep then the 1020 trays will hang off the edges of the shelf and risk being bumped into. I highly recommend spending a little extra money on a 20-24” deep shelf.
These are good 1020 size plug trays for starting seeds: 50 cell tray, 72 cell tray, 128 cell tray
For a 48” wide by 20-24” deep shelving unit, with five shelves, you will have space for (16) 1020 trays. When sourcing a shelf, make sure the shelves on the unit are not solid (you will need openings on the shelves to hang shop lights from). This 48” metal wire shelf is a perfect shelf for seed starting and identical to one of the shelves I use.
Related: How to Start Seeds with a Mini Soil Blocker
more tips for choosing a shelf for a seed starting setup
If you are growing lots of seedlings, buy a bigger (wider) unit than you think you need. I keep going through shelves because they aren’t big enough. I have graduated to a 6-ft wide shelf so that each shelf layer will hold (6) 1020 trays.
If you start seeds using a soil blocker, you will save space and require less shelf space.
Your shelving units must have holes on the actual shelves, or the shelves must be made of metal wire. This is so you can hang your lighting. No holes means you’ll have a harder time hanging the shop lights.
These plastic, washable shelf liners will prevent soil and water from falling thru the cracks and making a mess.
Learn: Why is Tilling So Bad?
how to choose lighting for seed starting
LED shop lights are the way to go for seed starting. Fluorescent shop lights ruled the seed starting world for a long time, but LED lights are much brighter, give off a larger spectrum of light, and are much more energy efficient than their fluorescent counterparts.
You will want shop lights that are the length of your shelving. If you have a 48” shelf, you’ll want 48” lights. The sizes of the bulbs do not matter (T12, T8 or T5), but you’ll want at least 2,000 lumens for seed starting. LED lights average at 5,000 lumens, so you’re covered if you go with LED.
THESE ARE THE TYPE OF LED LIGHTS YOU NEED - 4-ft LED Linear Shop Light. These type of LED lights work incredibly well and my cut flower, vegetable and herb seedlings grow wonderfully underneath them.
Related: How to Start a Sheet Mulch Garden
how to hang shop lights for seed starting
Over the past few years, I have been hanging two LED shop lights per shelf (like the lights here). If cost is an issue in getting started, you’d probably be okay with one light hanging above your seedlings instead of two. I think overall two lights is best (the more light the better), but I do think you’d be successful with just one light if you need to cut costs. LED lights are incredibly bright and cover a wider area compared to fluorescent lights.
LED shop lights are “linkable,” which means they plug into one another. Only one plug goes into the wall. Shop lights come with chains & S-Hooks included in the package, and you can hang the lights from the holes or wire openings in the shelves using these pieces. I’ve misplaced S-hooks here and there; in this case I will use paperclips or zip ties to serve the same purpose at no trouble nor cost.
How far to hang LED lights above seedlings?
I find that LED lights do not need to be as close to the plants because the light is so incredibly bright (as opposed to fluorescents, in which case the lights should be no more than 2” above the seedlings). I position my LED shop lights 4-6 inches above seedlings once they have an inch of green growth.
do you need seedling heat mats for seed starting?
LED lights actually give off a decent amount of heat. If you use humidity domes to keep heat and moisture in during germination, you won’t need to use seedling heat mats. LED lights don’t heat up as much as fluorescent lights, but if you cover your seed tray with a humidity dome and position the LED light just above the dome, enough heat will generate inside the dome to germinate seeds at 65-70 degrees. During cold months, I use a space heater just like this one in the seed starting room to keep the air warm during germination. Between the humidity domes and space heater, I do NOT have to use seedling heat mats for germination, EVER. I don’t even own them yet I successfully start thousands of plants from the cold months of January through April.
Related: 7 Steps to Start Planning Your Garden
pro tip: use a timer to help manage lighting
A simple Manual Outlet Timer is a lifesaver for turning your lights on and off everyday. When you have a timer that automatically controls the lights, then they get the actual amount of light they should, which is 16 hours everyday. I find that when I don’t use a timer, I’m turning the lights on and off on my schedule so they’re not getting that full 16 hours.
A timer might seem like an extra unnecessary gadget, but when you have other things going on in your life, having your lights on a timer will completely free you of having to remember turning them on and off twice every single day. It’s well worth the $15.
Most Popular: The Reasons Why Synthetic Fertilizers like Miracle-Gro Are So Bad for Your Garden
full list of seed starting supplies we recommend
Wire Metal Shelving Unit - A wire unit is easiest to hang shop lights and move the lights around (as plants grow, you will need to adjust the shop lights, and a wire metal shelf makes this easy to do). Choose a shelf that is at least 20-24” deep so the trays aren’t easily knocked off.
Washable Shelf Liners - Prevent soil and water from falling thru the cracks and making a mess. Removable and cleanable.
LED Shop Lights - These shop lights are perfect for starting seeds underneath.
Outlet Timer for Lighting - Lights turn on/off on their own, so you don’t have to fuss with it.
Perma-Nest Trays - Hard plastic trays that won’t break and make moving trays around, and bottom-watering your plug trays, a breeze. They’re worth every penny — you will never have to replace them.
Humidity Domes - I use humidity domes over my plug trays immediately after seeding to keep the heat in. This prevents the need for heat mats. 3-inch humidity domes are my favorite height.
Promix with Mycorrhizae - This is what we use for our seed starting medium. Learn about how we mix seed starting soil here!
Liquid Humate/Humic Acid - I mix into water when watering seedlings. Humate provides food for soil microbiology and also helps retain moisture and prevents seedlings from drying out. We also use this in our Compost Tea Recipe when watering in the field.


