How to Start an Easy, No-Till Sheet Mulch Garden

Updated on January 8, 2024
Want to learn the actual easiest way to start a new garden? Read along with me through this post as I describe how I started a new dahlia & vegetable garden in my backyard. I started this garden in the easiest way I knew how — using the Sheet Mulching method, which is a no-till permaculture gardening technique.
Sheet Mulching can be used to start any type of new garden, whether you’re planting cut flowers, vegetables, fruits, herbs or perennial trees and shrubs. I’ve even used the Sheet Mulching method to open up new flower beds on our commercial cut flower farm.
Sheet Mulching is the easiest way to start a new garden, and anyone can do it. With sheet mulching, you remove the backbreaking task of digging out your lawn. You simply layer organic materials on top of the grass. The grass will die overtime (within a month or two, depending on soil temperature), and you can plant directly into your new sheet-mulched bed afterward. Let’s go through the benefits and how-to so you can get your new Sheet Mulch garden going this season!
Related: How to Build a Healthy Soil Food Web
what is sheet mulching?
Sheet Mulching is the act of layering dried leaves, cardboard and soil or compost directly on top of an existing lawn. The layers of leaves, cardboard and new soil act as a deep mulch, smothering existing plant life underneath. Over time, the lawn underneath will naturally break down, and you can plant your new garden directly into it.
Related: Digging Deep: How to Suppress Weeds Organically Without Chemicals
the Benefits of Sheet Mulching
No need to remove grass! How amazing is that?! By sheet mulching, you completely remove the need of digging or tilling the grass out, which is hard, backbreaking work.
No rototiller needed. Sheet Mulching is a no-till gardening method that requires no machinery to remove grass or till up soil. Sheet mulching makes starting even really big gardens a much easier task.
The most fertile part of your lawn soil, at the grass root level, will be kept in tact. When you dig out your grass with a shovel, you remove the most fertile part of the soil in the top layer where the grass roots are growing, and where all the earthworm activity is. Sheet mulching keeps all of this in tact.
Related: Why is Tilling So Bad?
are there problems with sheet mulching?
I personally have never experienced problems when sheet mulching. Some farmers and gardeners say that soil can become compacted due to lack of airflow between the layers of cardboard and new soil; however, with proper technique, this will not happen. I’ll discuss the proper steps for preventing soil compaction below.
when is the best time of year for sheet mulching?
You can start a sheet mulch garden anytime of the year, but the Fall (late October-November) is generally best for a few reasons:
Dried leaves are readily available in the Fall, from your own yard and neighbors’ yards
If you can sheet mulch in the Fall and let your new garden sit all Winter long, your garden will be ready to plant in the Spring
Related: How to Fix Soil After Using Miracle-Gro and Other Chemical Fertilizers
what is needed for sheet mulching?
Dried leaves or shredded leaf mulch (collect for free from your own yard or neighbor’s yards)
Cardboard (keep broken down cardboard boxes over time)
Top soil or compost (source locally if possible)
Tools: Compost Fork for aerating lawn, Hard Rake for spreading top soil, Shovel & Wheelbarrow for moving top soil
Related: Our Favorite Resources for Vegetable Gardening: Books, Tools, Soil Amendments & Sourcing
Photo Tutorial for a Sheet Mulch Garden

1. Layer of mixed leaf mulch with whole dried leaves on the lawn, for a new garden hugging the driveway
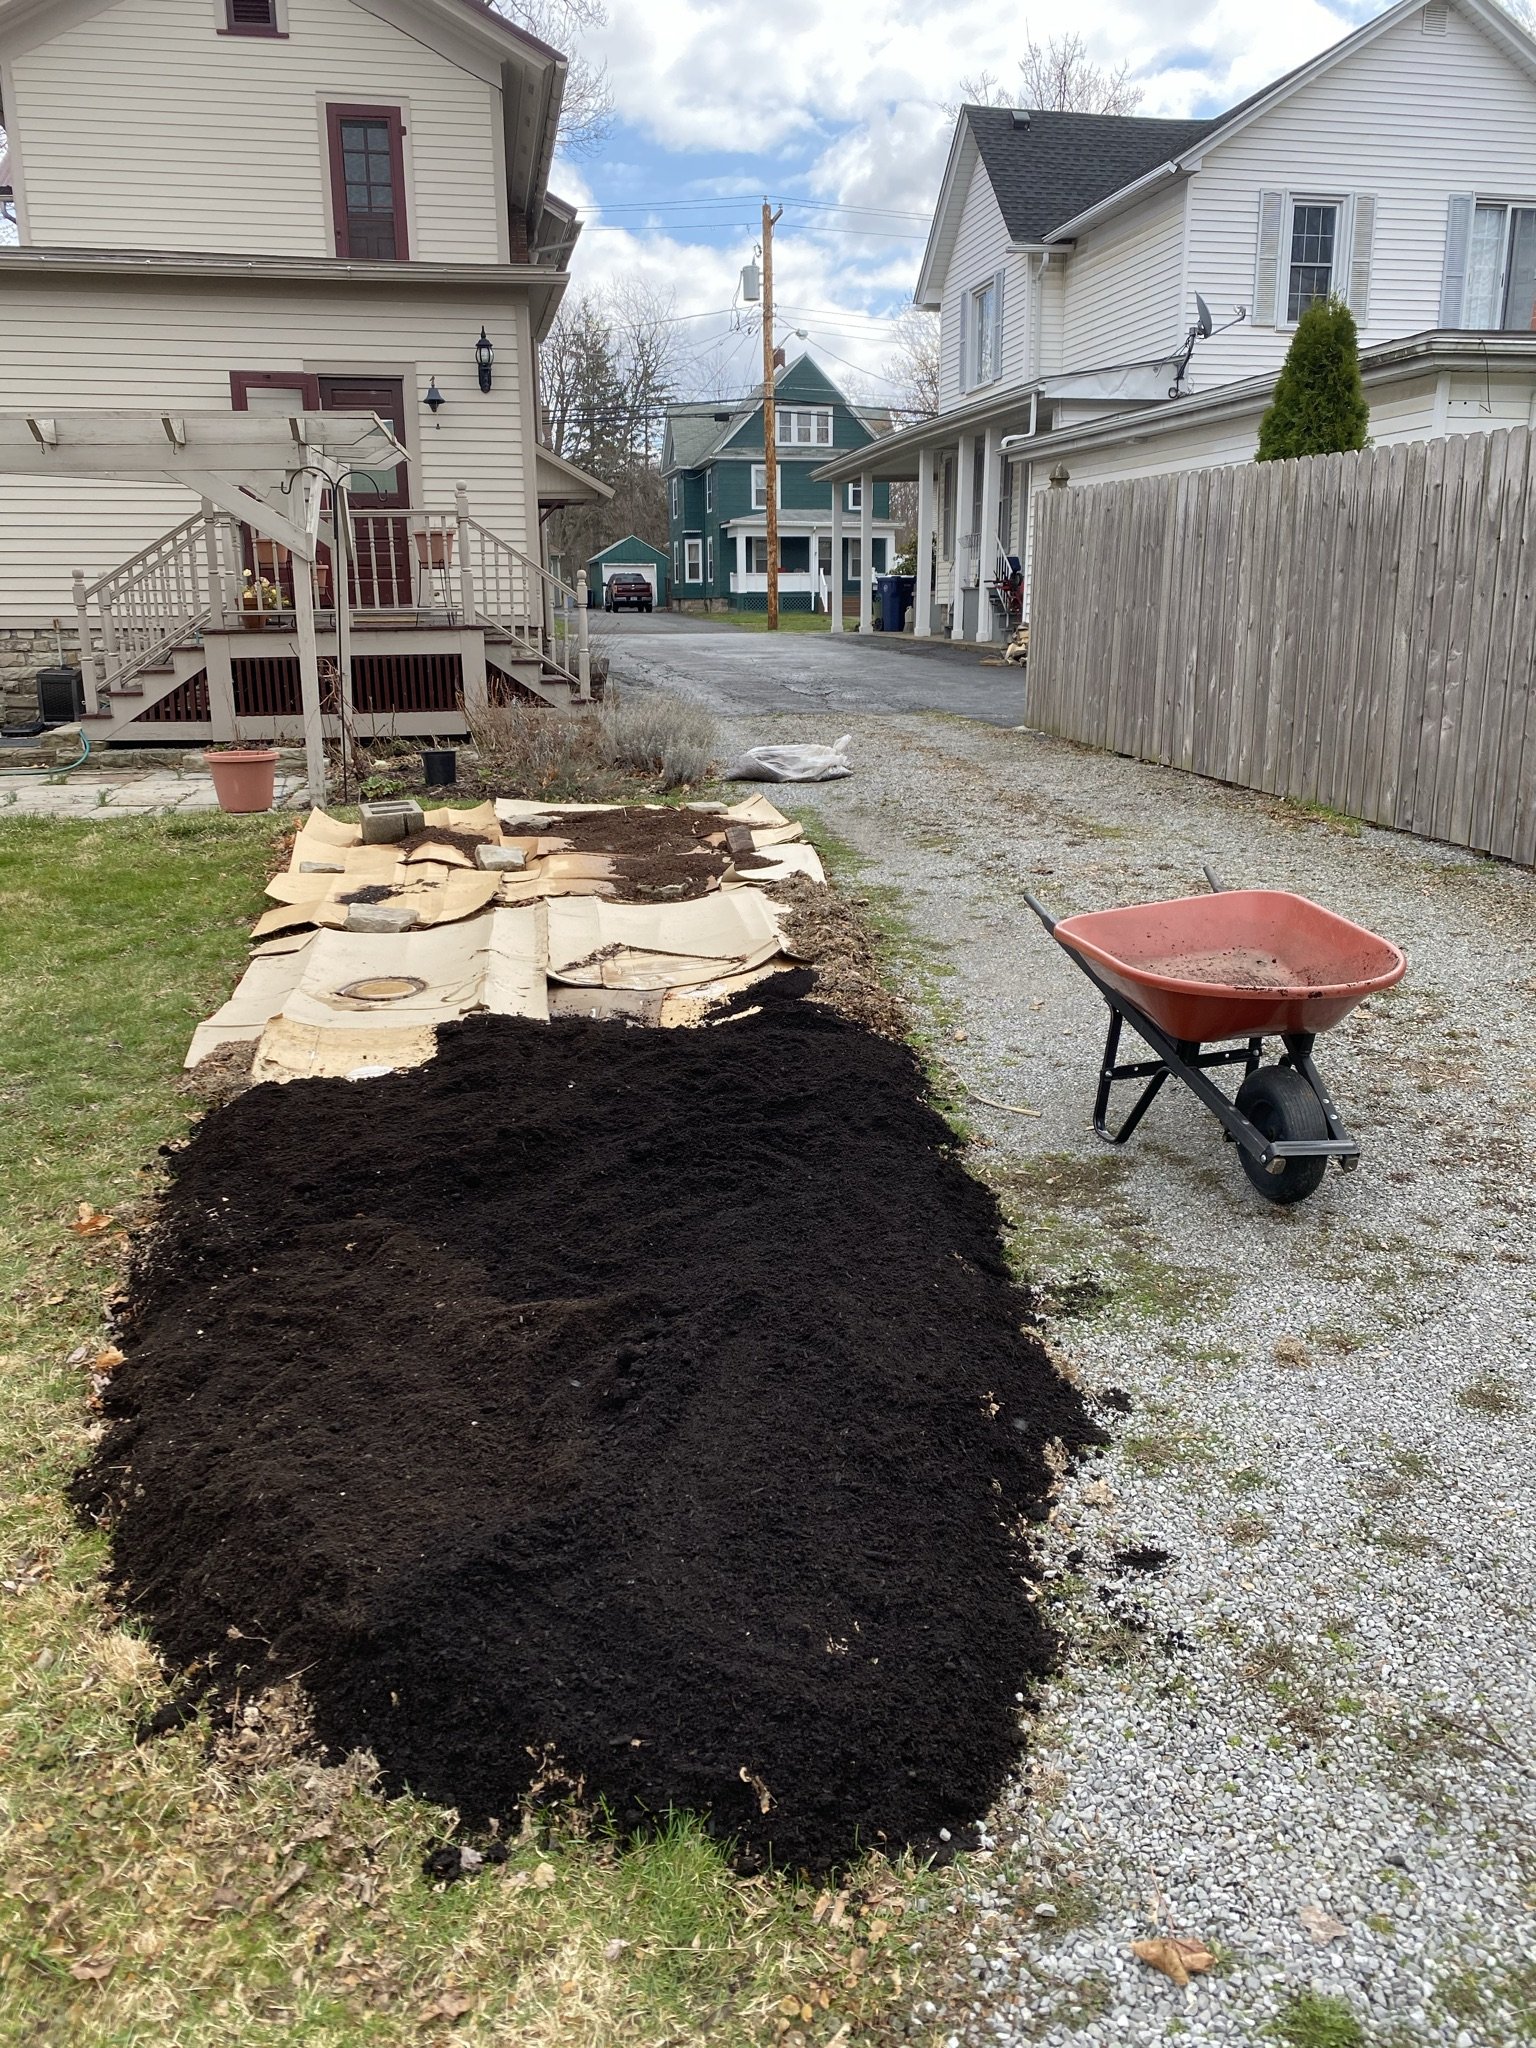
3. Fresh layer of top soil directly on top of cardboard
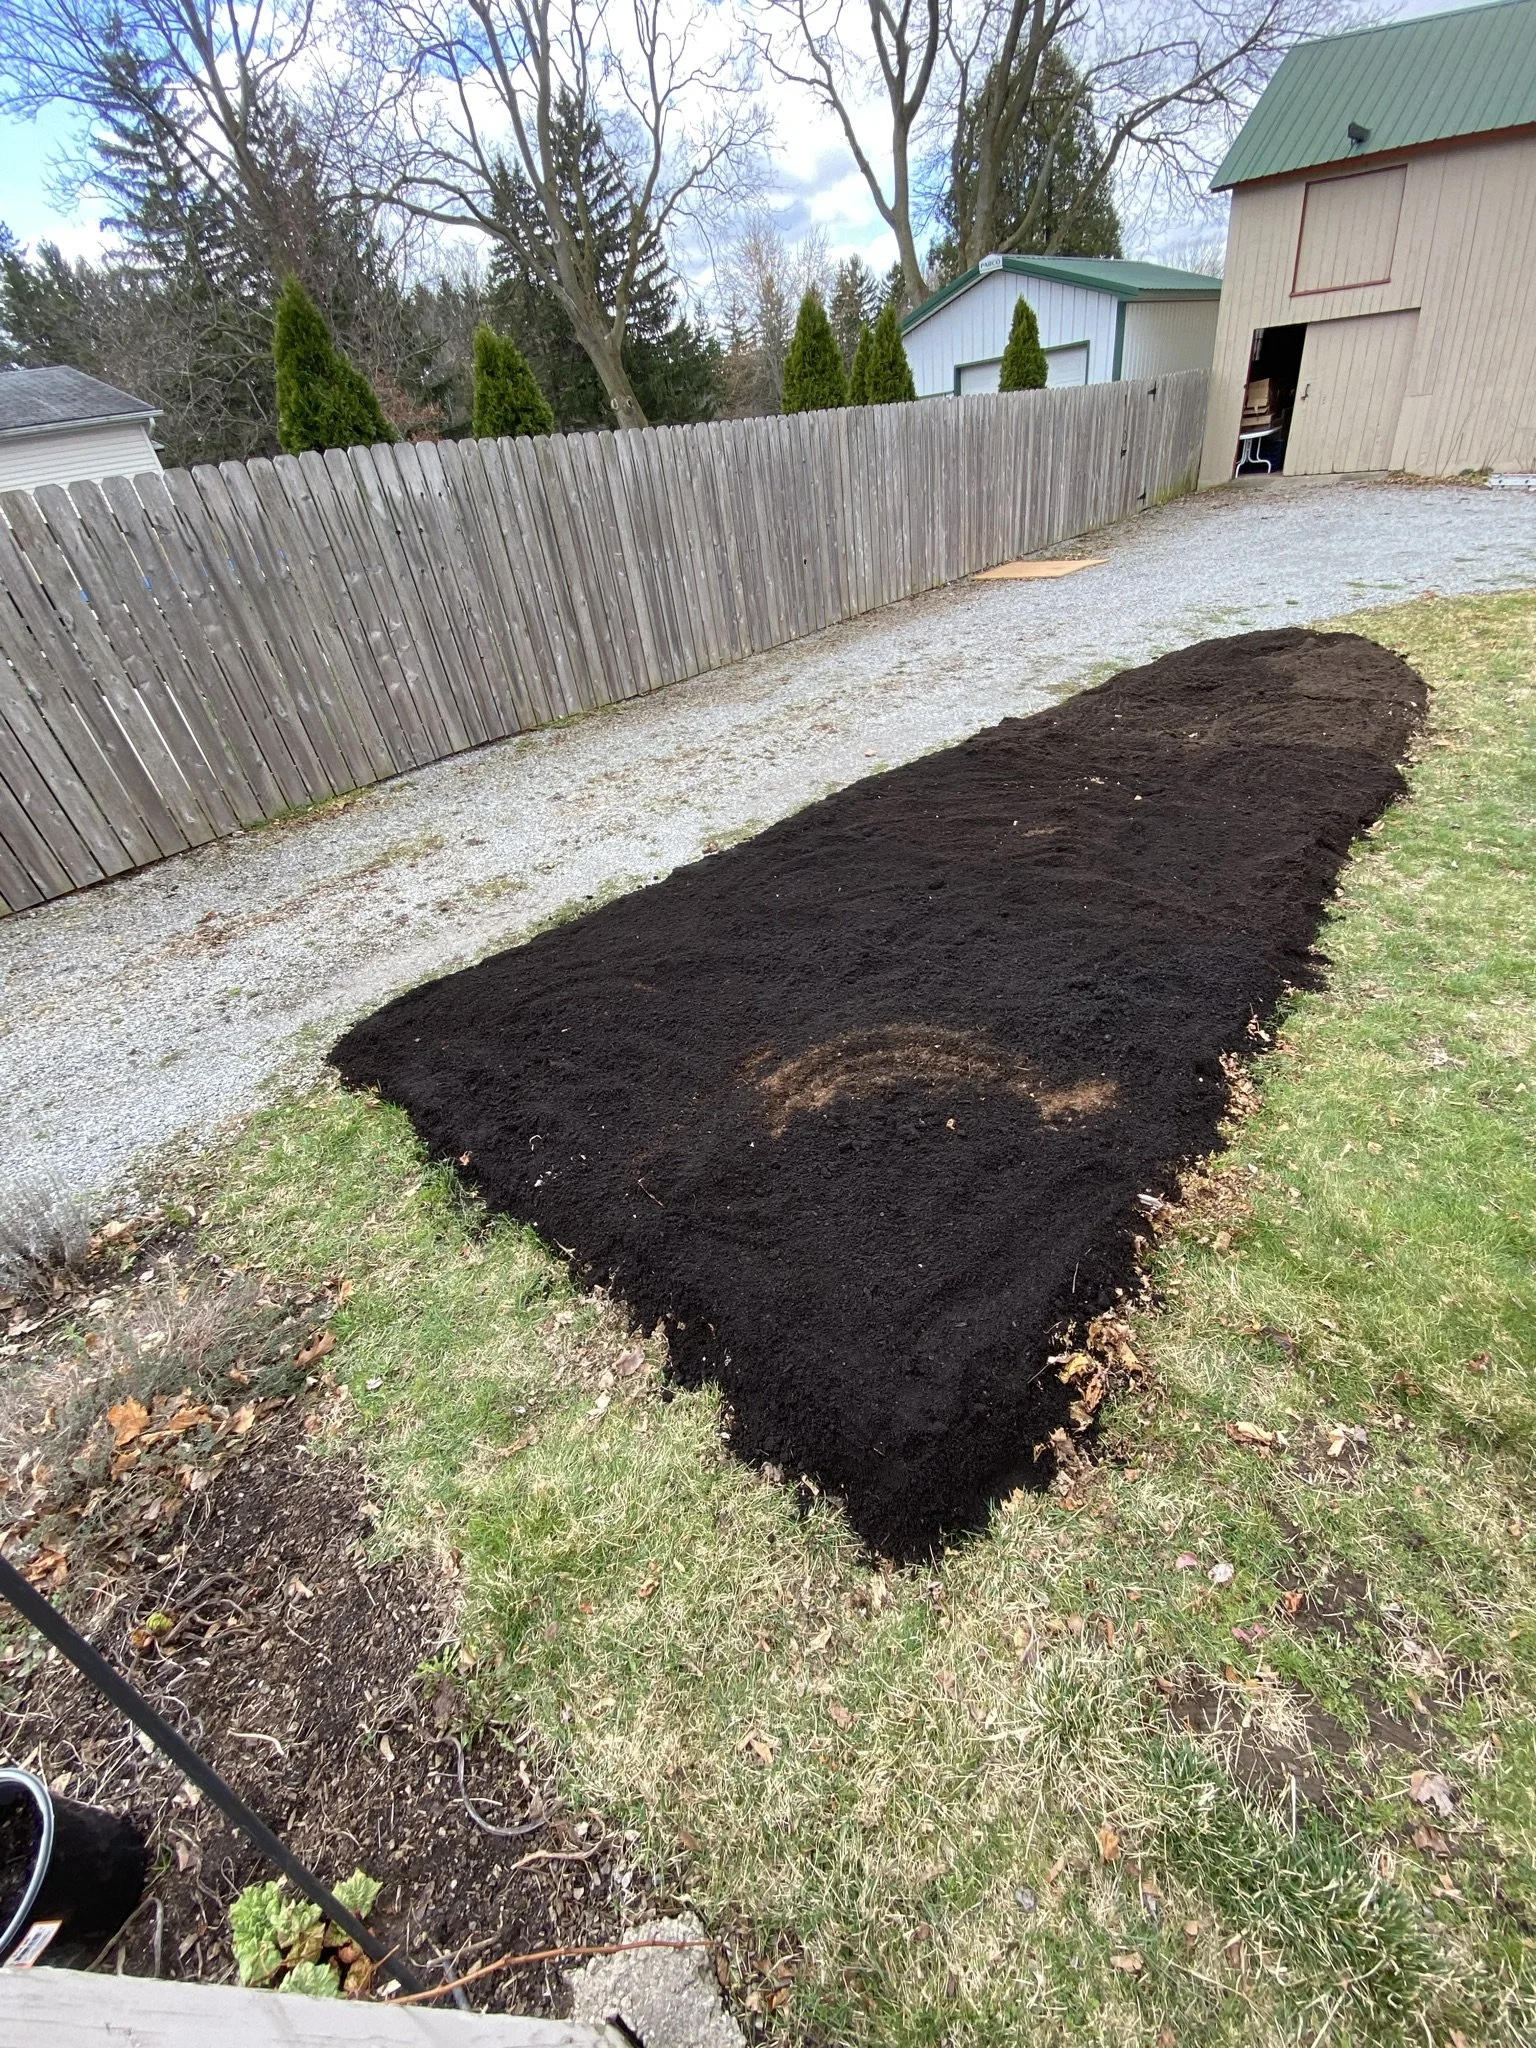
4. The garden sat for about 2 months from March-May before planting
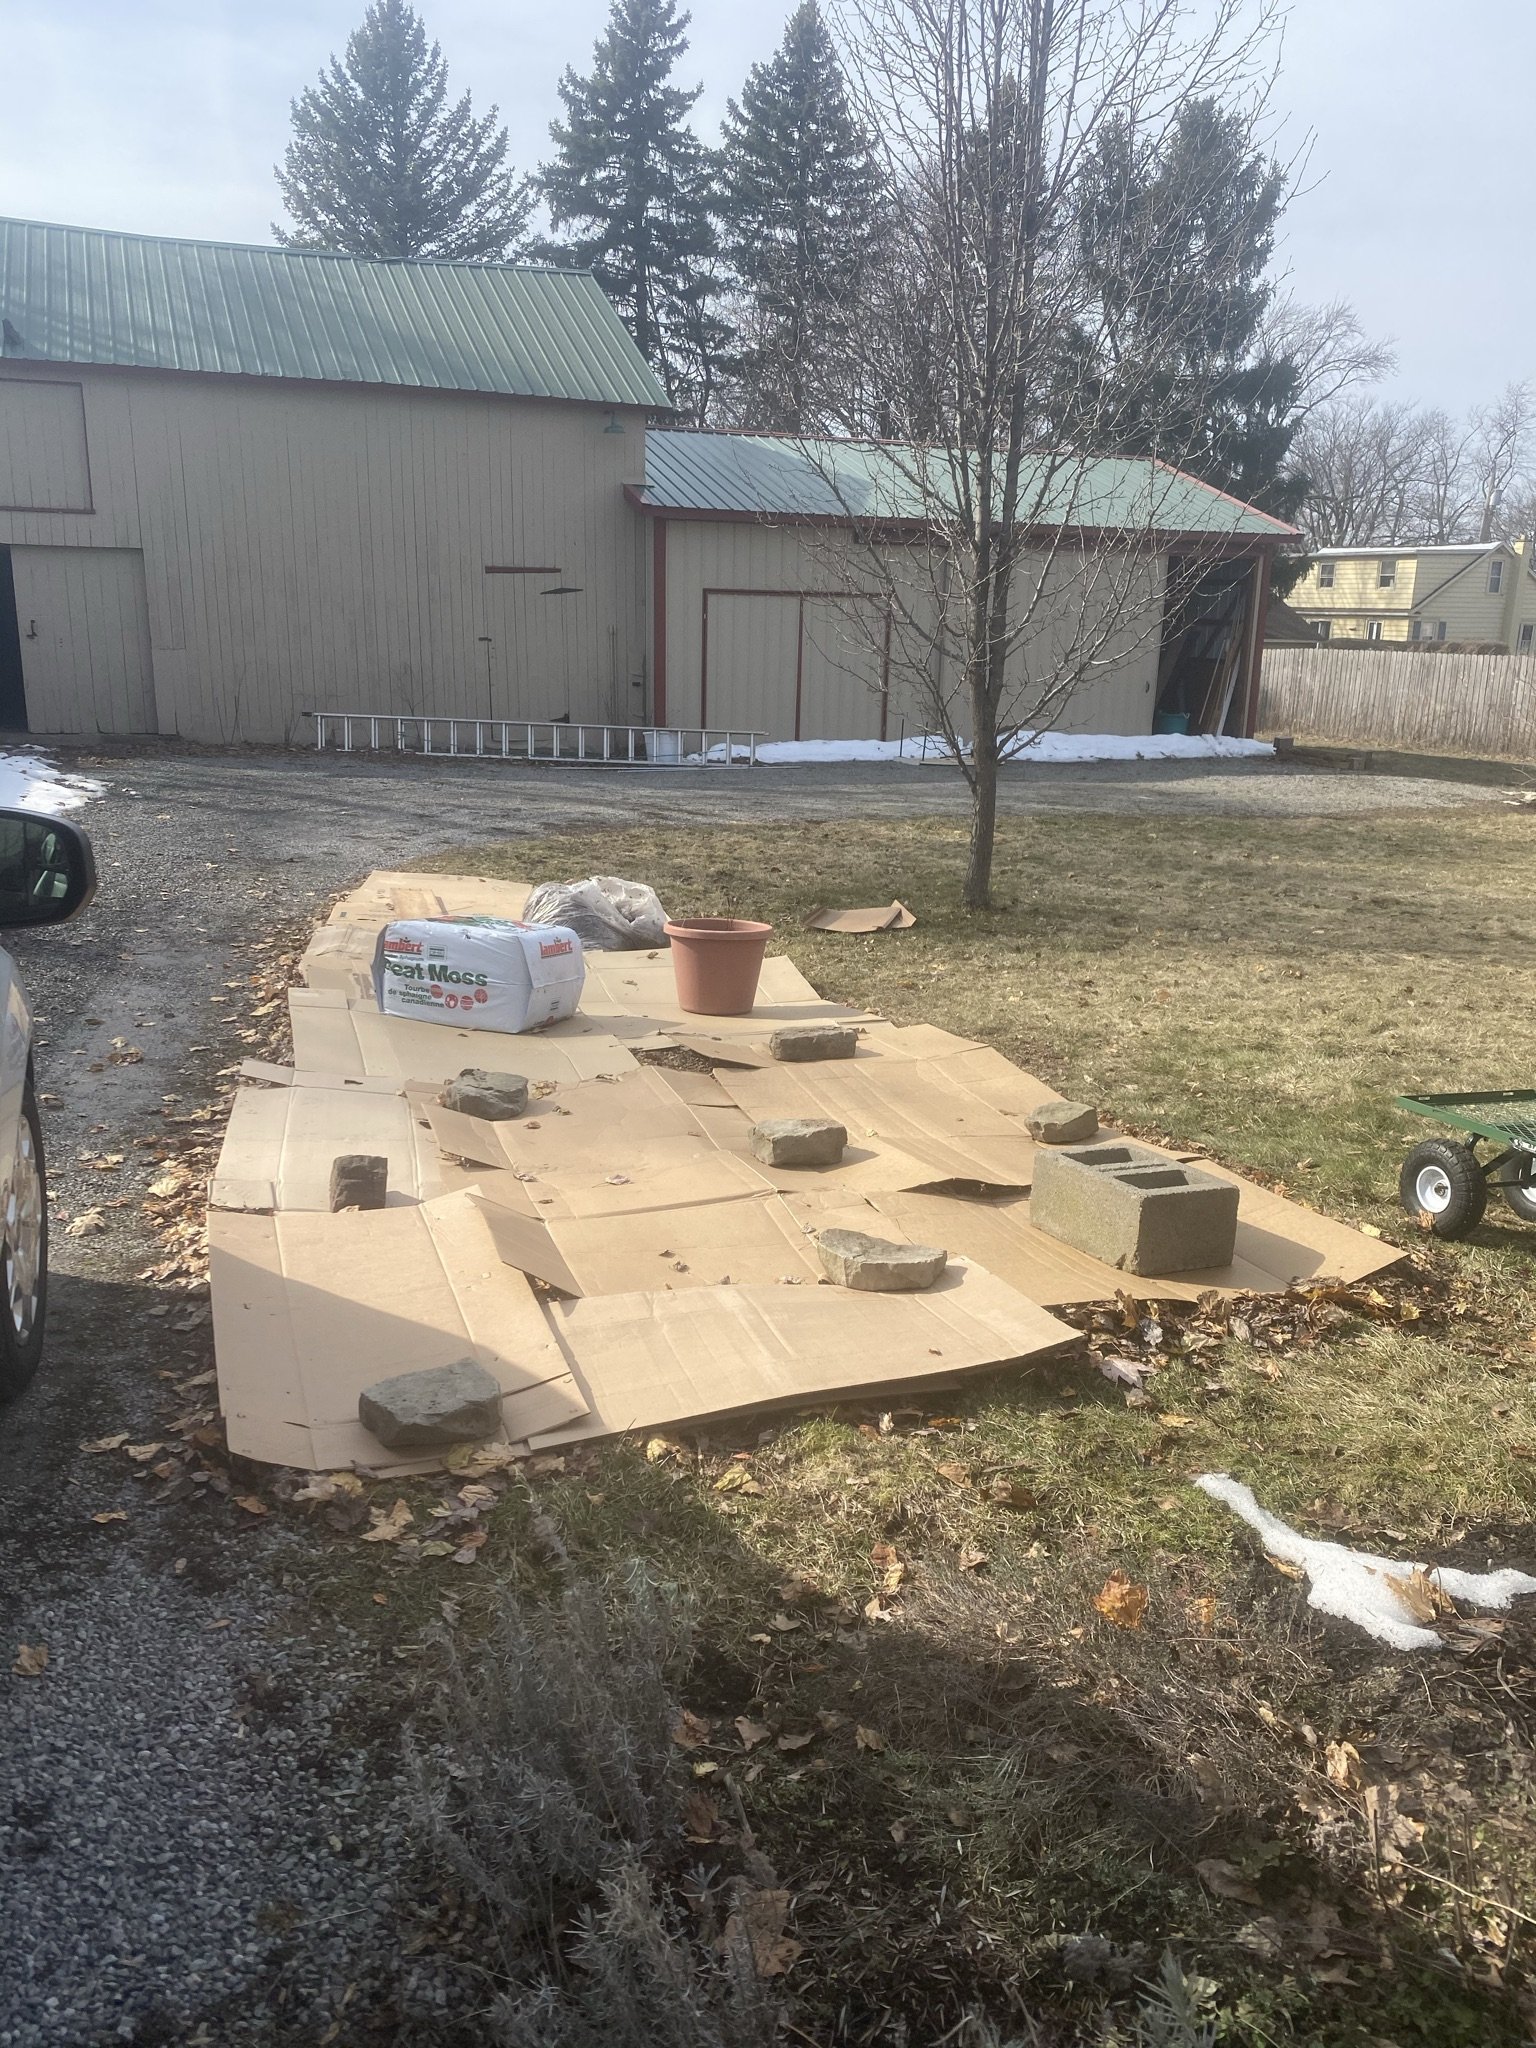
2. Two layers of cardboard on top of the leaves, held down by heavy things so they wouldn’t blow away in the wind
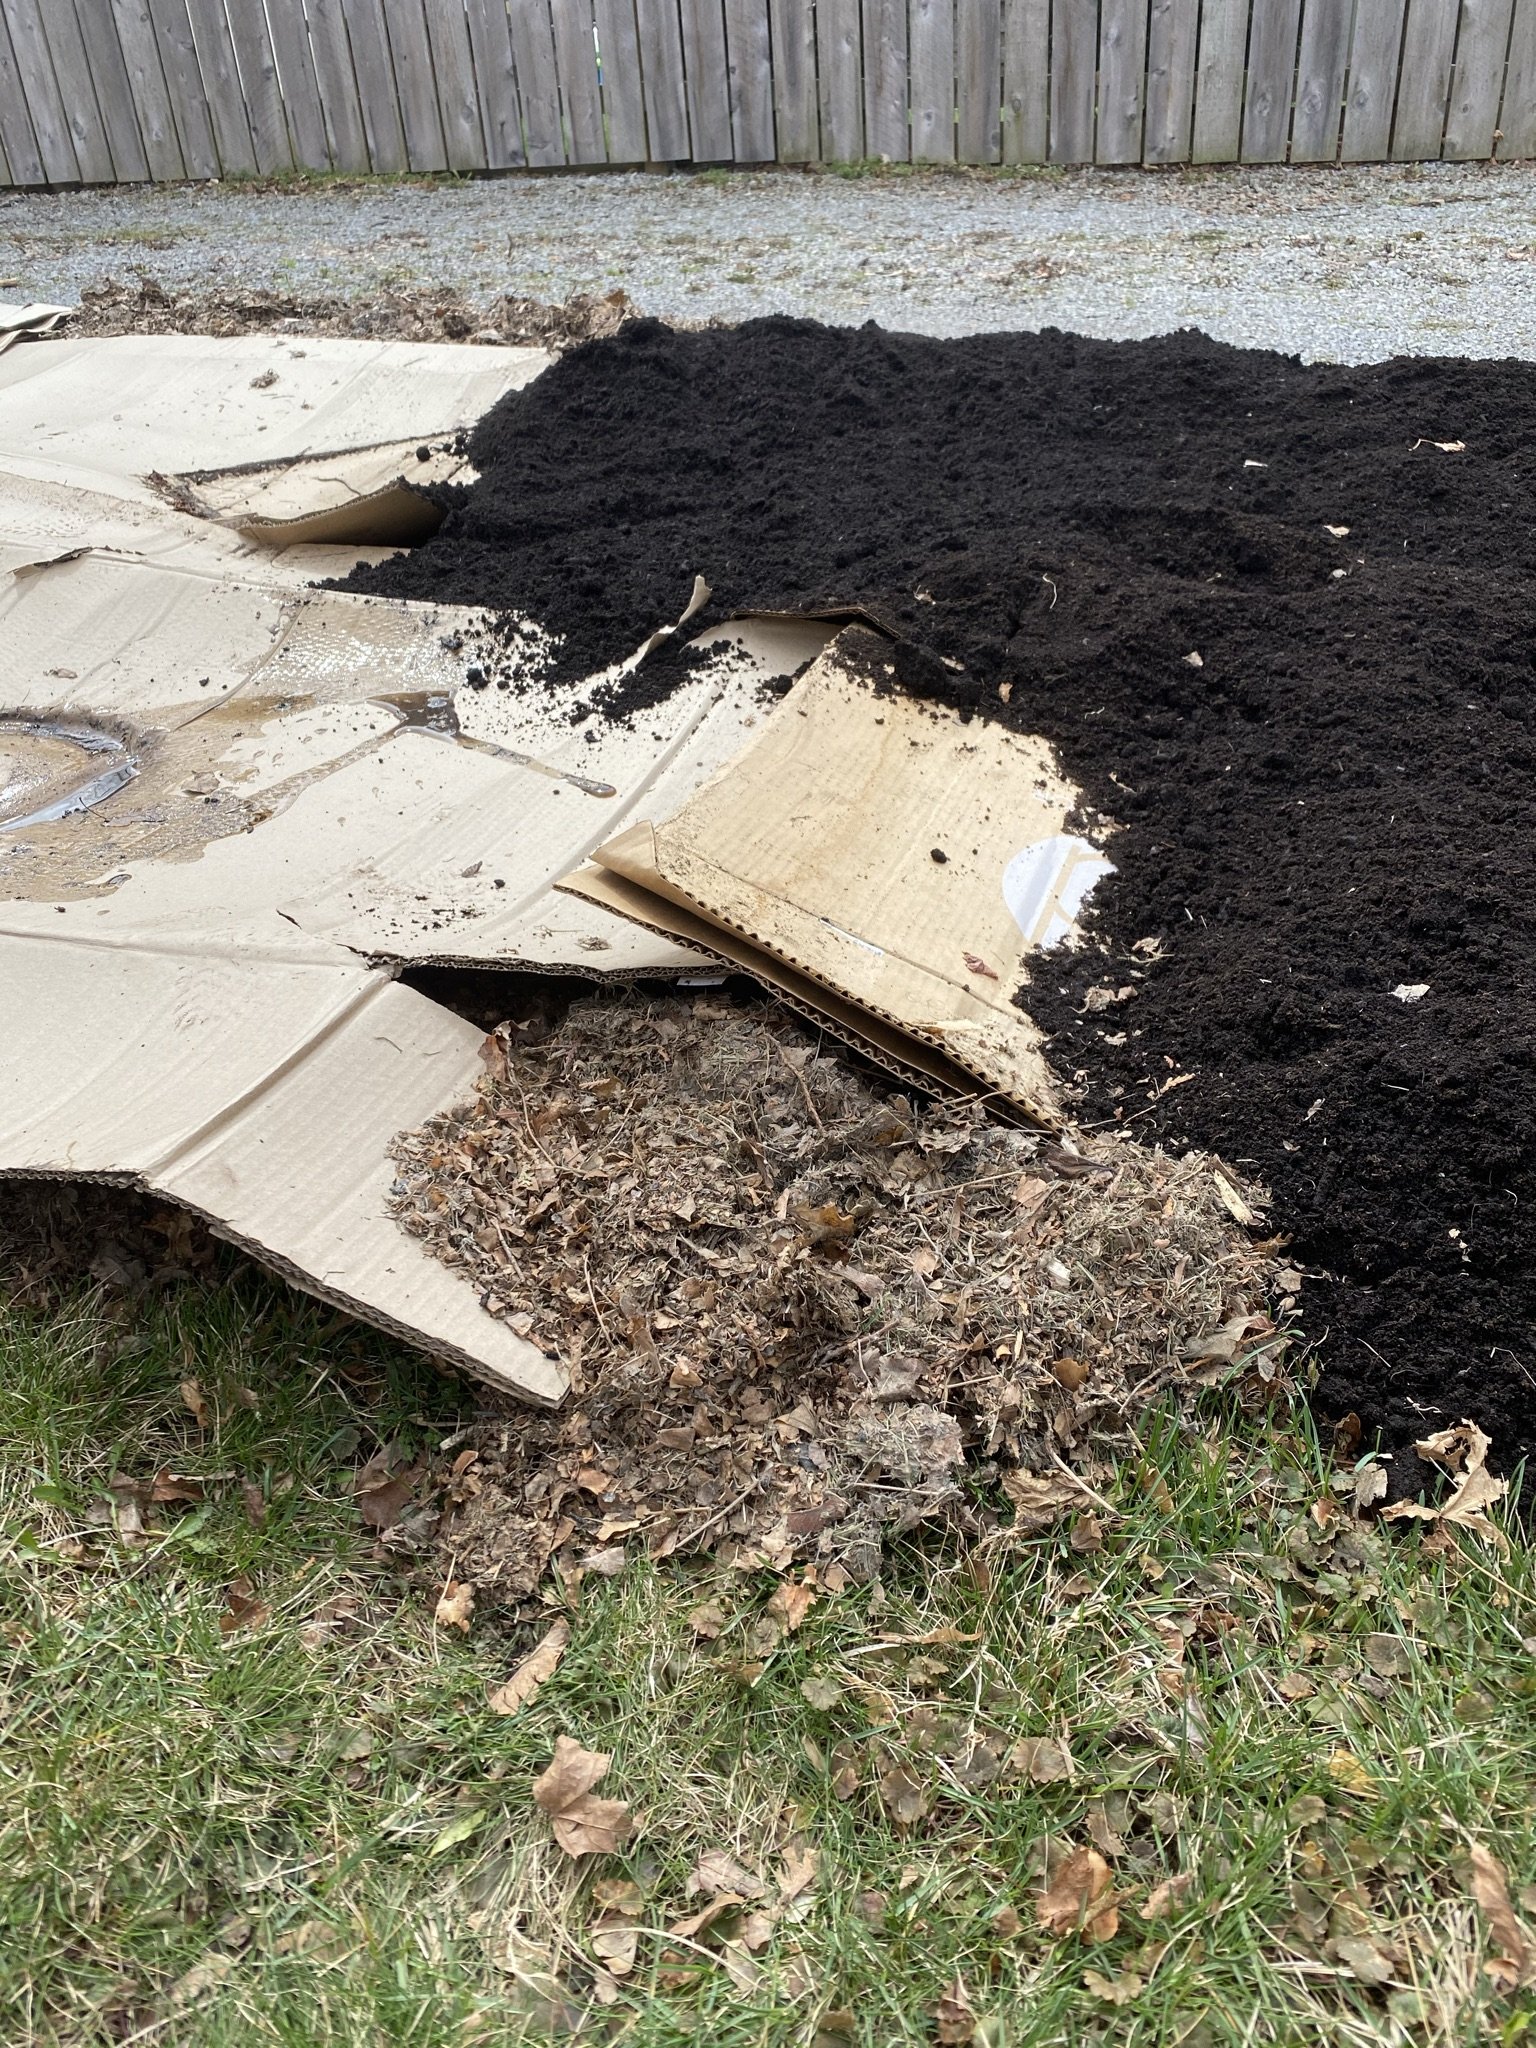
Here, you can see the three layers: leaves, cardboard, top soil
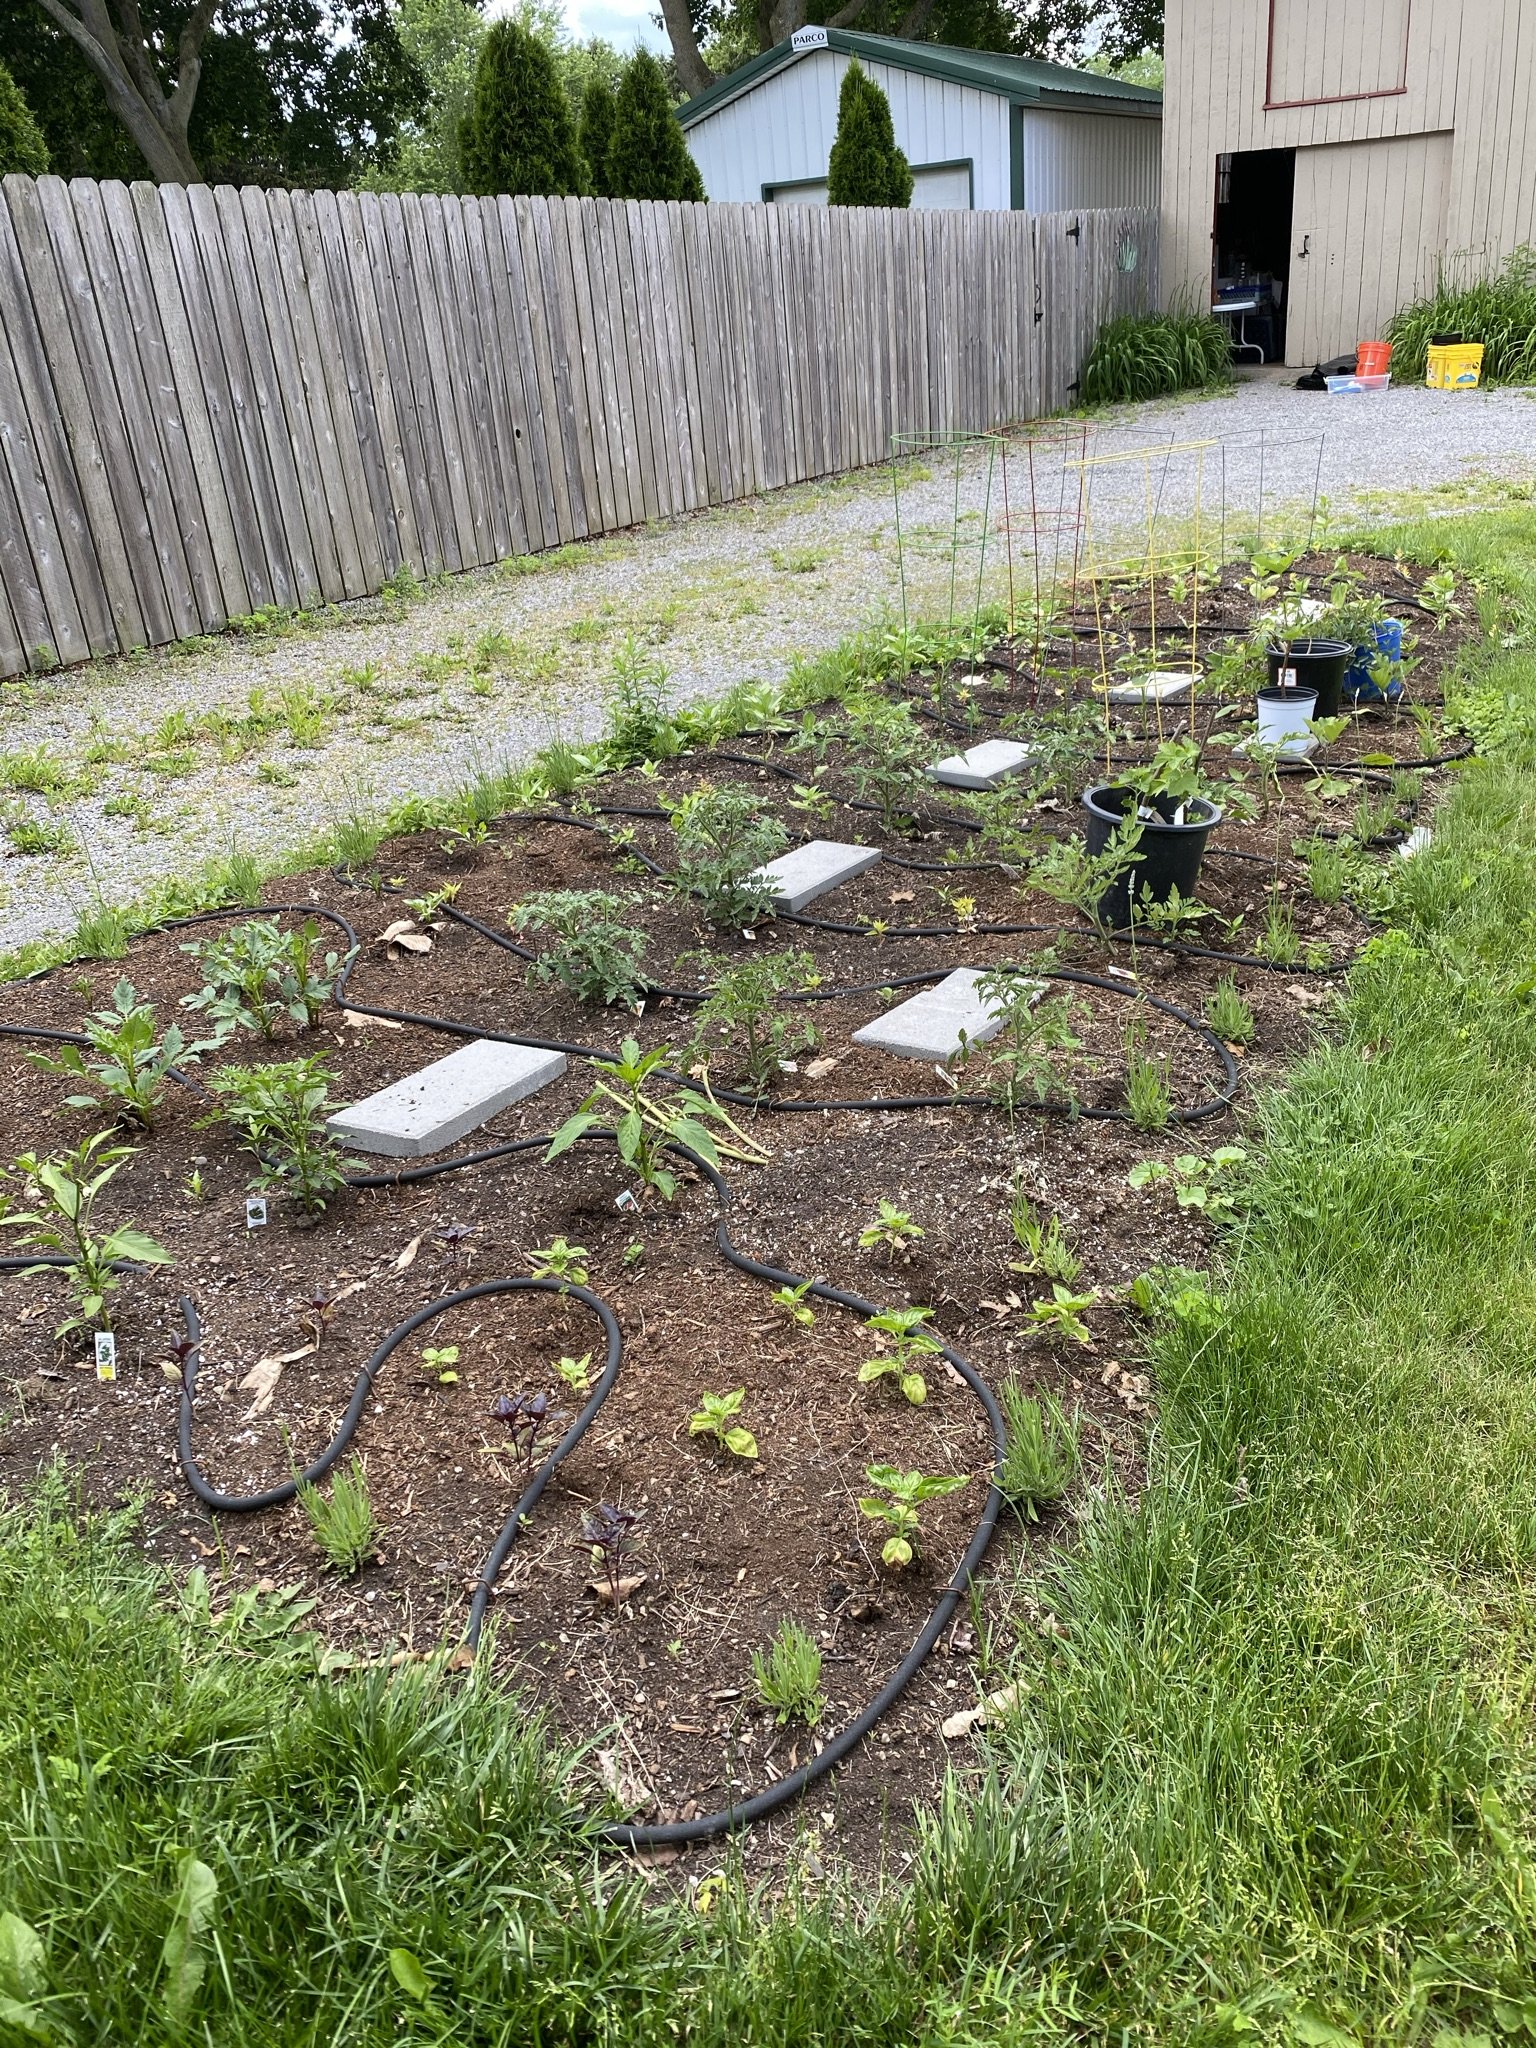
5. The lawn fully decomposed within 2 Spring months and then was planted with vegetable and herb transplants
How to Sheet Mulch a New Garden
This is the way I have been successful in starting new gardens using the sheet mulching method…
decide on the area where you want your new garden
There is a lot of criteria that goes into deciding where to start a new garden in your yard (sun exposure, location of trees and other existing plants, water source availability, etc). I suggest reading this post on planning for a new garden to make sure you have the knowledge you need to make the best decision on where to start your new garden.
aerate the lawn where your garden will go, using a compost fork
Poking holes in the ground will allow some of the leaf mulch to fall down into the ground, accelerating the break down process and creating pockets of air. You can aerate simply by sinking a Compost Fork down into the ground every 6 inches throughout the entire grassy area. If you do not have lawn where your new garden is going, I still recommend aerating with the Compost Fork — it will only help!
Apply dead leaves or leaf mulch directly on top of grass
Lay a thick 4-6 inch layer of whole or shredded leaves directly on top of the existing grass. Shredded leaves are better because they break down faster and allow more moisture to penetrate through the layers. You can shred leaves using your lawnmower (catch them in the lawnmower bag and dump on top of the new garden space).
Make sure to pick a non-windy day to do this, or all your leaves will blow away.
Why shredded leaves? Shredded leaves are one of the best forms of organic matter that you can add to the garden. Shredded leaves are a wonderful food source for earthworms and soil microbes, and ignite decomposition in the garden. Soil microorganisms break down the shredded leaf matter and turn it into minerals and nutrients for the plants to use.
Related: Fertilizing and ‘The Law of Return’
Cover the leaves with 1-2 layers of cardboard
Lay two layers of cardboard on top of the leaf mulch. For edible gardens, only use cardboard that has black ink (colored ink is toxic). I usually collect boxes throughout the year and break them all down, pull off tape, and stack them in my barn for future sheet mulching needs.
Why cardboard? Cardboard is a cheap, easy way to smother weeds and lawns without having to dig anything out (with the exception of tough perennial weeds like mugwort and Canada thistle). The cardboard will break down over the course of the first growing season, but will work to keep weeds, and the lawn, smothered.
Related: Natural Japanese Beetle Traps
Wet the cardboard
Hose the cardboard down — wetness will help it break down faster and will prevent it from blowing away while you’re gathering soil/compost to cover it with. If you aren’t applying soil/compost on top of the cardboard right away, you’ll need to hold the cardboard down with concrete blocks or heavy rocks.
Add top soil and compost on top of the cardboard
On top of the wet cardboard, add 4-6 inches of a top soil and compost blend. You can buy bagged garden soil if you don’t have access to a good topsoil supplier . Compost can be sourced in bags, from your local municipality or a local landscape supplier, but make sure you know what the compost is made up of (a lot of municipal and landscape supply compost is contaminated - learn why here).
To figure the amount of top soil/compost needed, use this top soil calculator here.
Related: All the Questions You Need Answered About Compost
wait for the lawn underneath to break down
Depending on the time of year and temperature of the soil, the breakdown process will take 1-3 months. In warmer months, the lawn will break down faster because soil microorganisms are more active when the soil is warm. In early spring, you could choose to cover the new sheet mulched garden for a few weeks with a silage tarp to warm soil and help break the lawn down faster.
Add soil amendments before planting
I recommend adding soil amendments just before planting. It is always recommended to get a soil test performed before adding amendments/fertilizers, so you know what your soil needs; however, if you don’t want to get your soil tested, there are a few safe-to-use organic fertilizers I recommend below.
Soil amendments I recommend using are Alfalfa Meal and Kelp Meal. Apply to your garden soil as noted on the directions on the package. I also always plant using Mycorrhizal Fungi Inoculant straight into the planting hole.
Related Post: Organic Fertilizers for a Cut Flower (or Veggie!) Garden
Plant your new garden!
You can plant seeds and transplants directly into your garden once the garden has sat and the soil microbes and earthworms have broken the grass down. The cardboard, when insulated by a deep enough soil/compost layer, will stay wet and worms will begin to break it down right away. They absolutely love cardboard!
The next few years going forward, continue to top off your garden with a fresh 1-2 inch layer of organic compost!
Related: How to DIY a Seed Starting Setup
Good luck preparing your new garden with ease, and please leave a comment to let us know how it went for you!